
Vehicle Simulator has two types of instrument panels, the ones you see directly on screen, and the ones you see attached to vehicles.
These panels function in the same way, all their instruments and switches work when you manipulate them with your mouse, and the data they show is related to the vehicle you control.
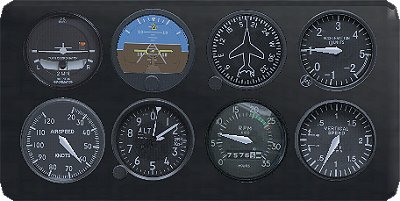
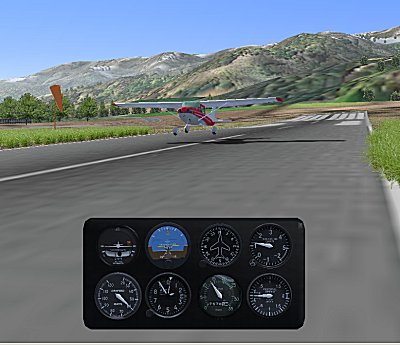
Press P to show the panel, this will show you a panel specific to the vehicle you control, for example the panel for planes looks like this:
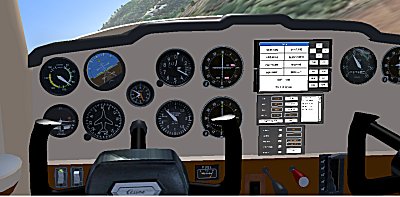
The onboard panel of this type looks like this:
Panels can be used also in tower view of your vehicle, and you can control it from a distance like a radio controlled vehicle.
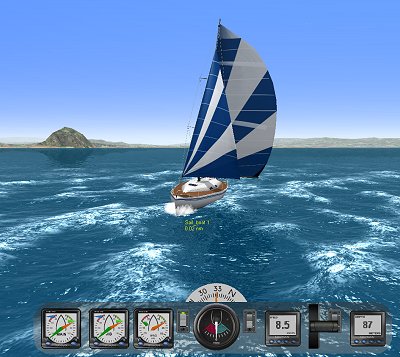
Any vehicle can show any panel you wish to show, press Control + P to show panel selection dialog.

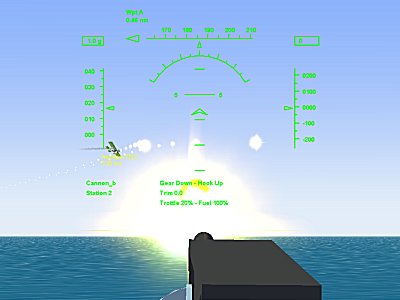
The head up display or HUD is used to show vital flight information around
your point of view, press H to show the HUD.
The HUD is also used in some instrument panels, and displays the same data as
the onscreen HUD.
These are the types of data displayed on the HUD:
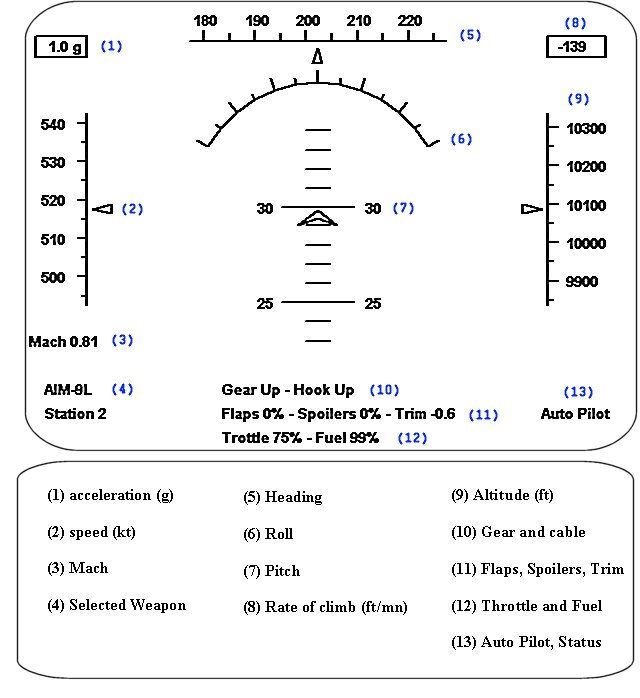
The heading shown on the HUD can be the true heading of the vehicle, or can be the heading of camera view, to select camera heading select "Free View HUD" from the vehicle options dialog.
Any vehicle can be configured to carry weapons, weapon types include; bombs, cannons, rockets, guided missiles and torpedos.
To select a weapon press Shift + Backspace, this will cycle between existing
weapons and show you the selected type in the HUD view.
Weapon will only be selected for vehicles which have a weapons defined.
When a guided missile is selected a diamond shape will appear on the HUD and a lock tone will be heard when another vehicle is in view, this means the weapon is locked on the other vehicle and will intercept it when fired.
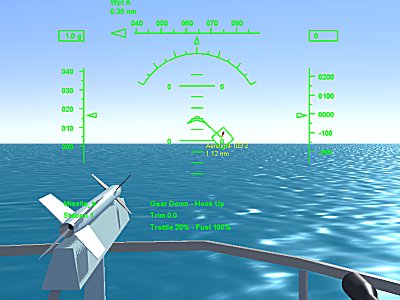
Each weapon can be aimed to your point of view, to select a weapon press Shift + Backspace, or use the weapon view of the aerial radar, you can use the Telescope view, or the HUD view as sight to aim your weapon, the HUD also shows lock on status and sound when the weapon is guided and locked upon a target.
When a bomb is selected a square shape will appear under the plane, and a line connecting it to the center of your HUD, this square marks the Continuously Computed Impact Point ( CCIP ), using this point you can plan your bombing more precisely.
To shoot the selected weapon press Backspace, or joystick button 1.
Each vehicle and each scenery object you shoot upon can sustain a certain amount of damage, when hit a simple explosion will be seen, when the damage is larger smoke or fire will be seen as well and vehicle will be broken.
To manage weapons, targets and ranges use the RADAR screen below.
Weapons can limited or unlimited, when weapons are limited their weight is subtracted from the weight of the vehicle when they are shot, and also the quantity diminishes untill no shells are left for this weapon type.
The amount of shells available for each weapon type is shown on the HUD for each weapon selected.
Weapons can be reloaded using Control + Backspace.
Vehicle Simulator contains two types of radars, marine radar and aviation radar.
The AVIATION RADAR is responsible for showing targets around your vehicle, weapon status for your vehicle, and for engaging and firing upon these targets.
Press R to show the following screen:
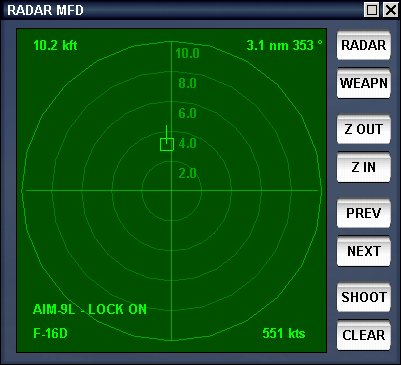
The RADAR instrument has two screens, RADAR and WEAPON, to show either one press the appropriate button on the top.
The two buttons below zoom in or out, any target closer than the maximum distance shown, is drawn as a cross, or as a rectangle when selected.
To select targets and display their data press Next or Prev, when a target is selected the selected weapon will lock upon it, and you will see its data in all four corners of the screen.
To clean a selection or unlock a weapon press Clear, to shoot the locked or selected weapon press Shoot.
Pressing Weapon shows the Weapon screen:
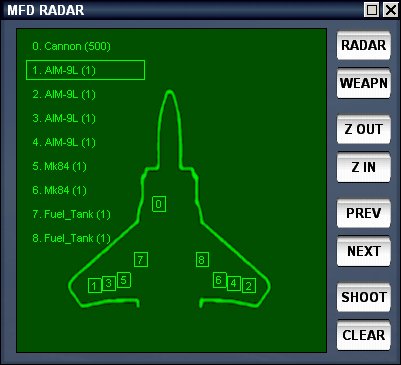
The weapon screen, shows you the available weapons you vehicle has, and also the stations on which they are attached.
The weapon screen has similar functions as the RADAR screen, but the Prev and Next buttons select weapons and not targets.
When a weapon is locked upon a target its status will appear inside the selection rectangle.
The quantity of rounds left for each weapon is shown inside the parenthesis.
The MARINE RADAR is responsible for showing targets around your vehicle, collision prediction for these targets, and elaborate tracking information.
Press Shift + R to show the following screen, this dialog has several modes which are typical to a modern radar instruments.

Adjusting position - to move the map use the four arrows at the top, this also puts the radar in the off center position and you see the "OFF-C" appear on the bottom right of the screen.
The bottom side of the screen shows your position, speed and heading, when the map is in off center mode, the position is the position of the center of the map and not the position of your boat.
To return the map to the center, press the "CTR" button.
Adjusting range - to adjust the range of the radar press the "Z OUT", "Z IN" buttons, you will see the range appear on the top left side of the screen, and the spacing between each ring in nautical miles.
Adjusting zoom - after you press the arrows or the zoom buttons the knob goes into zoom mode, drag the mouse over the knob to control the zoom level, the zoom is shown on the lower right side of the screen.
Selecting modes - the radar map has four modes of display:
North up - the map is pointing north.
Head up - the map is pointing where your ship is heading.
Track up - the map is pointing to the next waypoint.
True motion - the map points up, and the land becomes static, your ship is moving just as it would move on a regular static map.
The selected mode is shown on the top left side of the screen, the white line going from the center of the map, is the heading line, it shows your heading.
Measuring azimuth and distance - the radar can measure azimuth and distance from the center of the map to any point on the map, to do so use the "EBL" and "VRM" buttons.
The "EBL" bottun shows the yellow EBL line on the map, and sets the knob to EBL mode, you can adjust this line using the knob and read the angle on the bottom part of the screen.
The "VRM" button shows the yellow VRM circle on the map, and sets the knob to VRM mode, you can adjust this circle using the knob and read the distance on the bottom part of the screen.
EBL and VRM can be used together to get the exact distance and azimuth to a target.
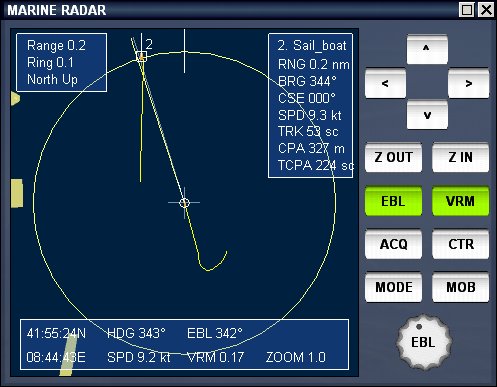
Acquiring targets - when the radar identifies a moving object as a target this target becomes acquired, you can acquire any boat including your own and see its information displayed on the upper right corner of the screen.
The information displayed is: the name of this boat, the range to this boat, the bearing to this boat, the course it is traveling, the speed it is traveling, the length of track shown, the closest point of approach, the time to closes point of the approach.
When you acquire a target the knob goes to track mode, you can adjust the length of visible track line by adjusting the knob, the track line is shown in green behind the targets, and its length is measured in minutes.
Measuring collisions - When two boats head towards each other and their courses are not parallel their courses will intersect, the boats will become closer and closer until they collide of pass by each other.
The closest distance between the boats is calculated by the radar and is shown on the upper left area as closest point of approach and time to reach this point.
When the closest point between the two boats ( TCPA ) is less than the radius of the two boats combined there will be a collision between these boats, the time to this collision is shown as time to closest point of approach ( TCPA ).
The image above shows such possible collision about to take place in 74 seconds.
Man overboard - when you press the "MOB" button, a yellow rectangle will appear on the map at the same position you are in, this will allow you to return to the same point, your path will also be shown in green.
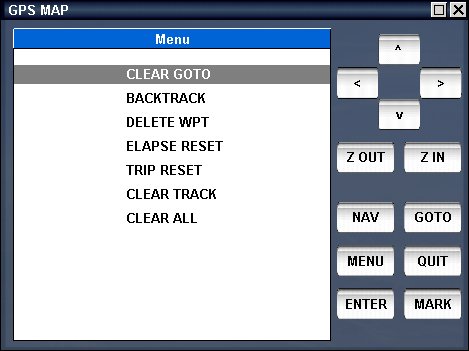
The GPS is one of the most used instruments in aviation, and navigation in general, press Shift + G to show the GPS.
The GPS has several modes which are typical to a modern GPS with map, the layout used is similar to the one used in various Garmin hand held devices.
Switching between modes is done by pressing the "NAV" button.
The Time screen - this screen shows the time of day, time to go until the next waypoint is reached, estimated time at next, time elapsed since start of navigation, distance to go until next waypoint and total distance passed since start of navigation.
You can reset the trip and the elapsed time using the menu of the GPS.
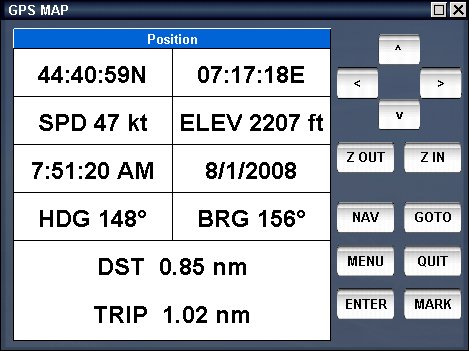
The position screen - this screen shows your position, speed, elevation, time of day, date, heading, bearing to next waypoint, distance to next waypoint and total distance traveled.

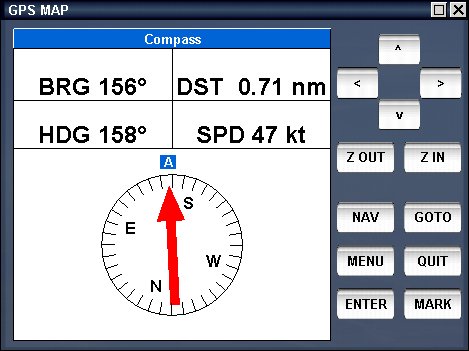
The compass screen - this screen shows your bearing to next waypoint, your distance to next waypoint, your heading and your speed, the rosette shows the compass and the next waypoint relative to you, the needle shows the direction to the waypoint.
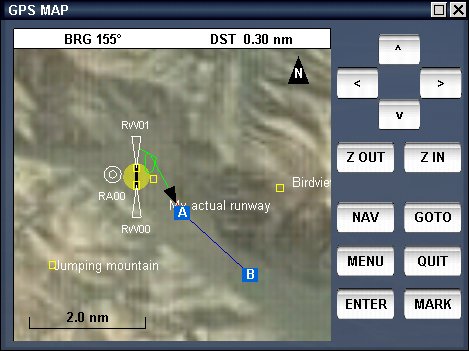
The map screen - this screen shows you the map, upon it your position is marked as a black triangle pointing to your heading, the waypoints and route are seen also as they are on the main map of the program.
You can pan in all directions and zoom in and out to see the area of interest on the map.
The goto screen - If you
wish to set your next waypoint press "GOTO" button.
If you wish to set man overboard waypoint, press "GOTO" and then "MOB".

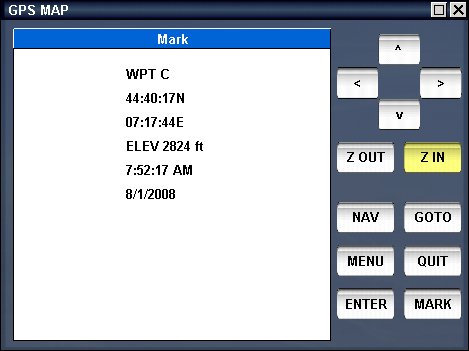
The mark screen - You can mark your position as a new waypoint by pressing "MARK" and "ENTER".
The menu screen - You can also perform other functions using the "MENU" button.
To accept a menu command press "ENTER", to cancel press
"QUIT".
The most challenging flights are made when visibility is poor or when complicated navigation has to be performed, few planes have actual moving maps and GPS displays, but almost all of them have radio navigation instruments which can be used for finding your location and performing accurate approaches and landings in limited visibility.
When you open the map you see radio navigation aids colored in white, these consists of NDB , VOR, ILS beacons.
NDB can be picked up by the ADF or RMI instrument on your plane.
VOR can be picked up by ILS, VOR, NSD, ADI instruments on your plane.
ILS can be picked up by ILS , ADi instruments on your plane.
Selecting these navaids is done using the NAV dialog or by pressing N, the following screen appears:
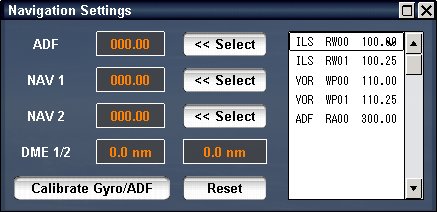
In this screen you have selection of ADF, NAV1, NAV2 frequencies, and also DME ( distance measuring equipment ) readings for NAV1 and NAV2.
Only appropriate navaids can be selected for each type of navigation instrument you have, selecting a wrong type will result in the frequency showing 000.
Instruments have a limited range for which they are effective, if you select an instrument which is too far, the instrument will show you the red indicator and will not receive the signal from this device.
Each radio or navigation instrument can be adjusted using the mouse only, to adjust an instrument use left mouse drag and pick on the instrument you wish to adjust, then move the mouse up or down.
The following instruments can be adjusted:
Gyro - moving mouse up down will adjust the heading.
ADF - moving mouse up down will adjust the heading.
RMI - moving mouse up down will adjust the heading.
VOR - moving mouse up down will adjust the OBS.
ILS - moving mouse up down will adjust the OBS.
RMI - moving mouse up down will adjust the OBS.
To clear all adjustments and frequency selection use the Reset button.
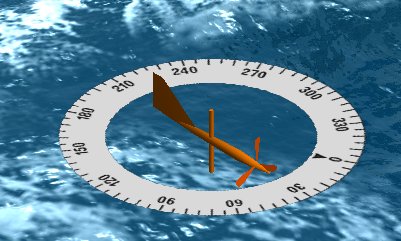
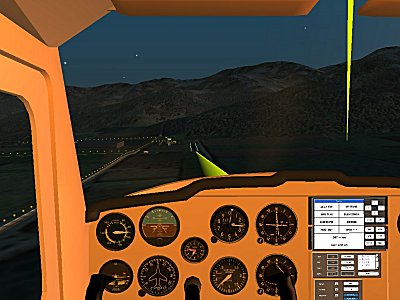
To visualize radio navigation use the option Show Navaids in the vehicle settings, this shows you the ILS, VOR and NDB as seen in the following picture.
Any type of vehicle has its own auto pilot with its own functions, for planes the auto pilot screen contains automatic landing and take off as well as the elevation, heading, rate of climb, collision avoidance and navigation.
Press A to show the auto pilot screen, this is the layout for airplanes :
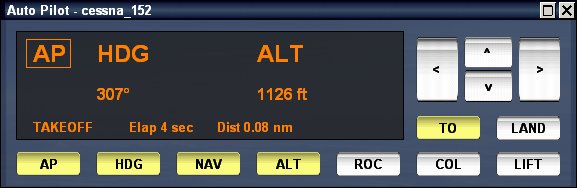
The auto pilot layout is based upon the Bendix/King auto pilot family, the functions of the buttons are:
AP - enables or disables the autopilot functionality.
HDG - enables the heading control, when pressed sets the current heading as the value to maintain, pressing the left and right arrows on the right side of the instrument changes the heading by 10 degress.
NAV - enables waypoint navigation, when active the and waypoints exist, they take precedence over the heading function.
ALT - enables the altitude control, when pressed sets the current altitude as value to maintain, pressing the up and down arrows on the right side of the instrument changes the altitude by 500 ft.
ROC - enables the rate of climb control, when pressed sets the current rate of climb as value to maintain, pressing the up and down arrows on the right changes the rate of climb by 100 ft/min.
COL - avoids collision with land, when imminent collision is detected throttle and steering are used and take precedence over all other functions.
LIFT - this function attempts to find best lift when flying a glider or without engine power.
LAND - this function auto lands the airplane at nearest runway when available.
TO - this functions performs automatic take off, turning on engine, turning off brakes, and establishes a climb untill 500 ft AGL is reached.
Press A to show the auto pilot screen, this is the layout for boats :
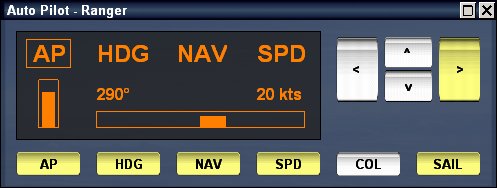
The auto pilot layout is based upon the Bendix/King auto pilot family, the functions of the buttons are:
AP - enables or disables the autopilot functionality.
HDG - enables the heading control, when pressed sets the current heading as the value to maintain, pressing the left and right arrows on the right side of the instrument changes the heading by 10 degress.
NAV - enables waypoint navigation, when active the and waypoints exist, they take precedence over the heading function.
SPD - enables the speed control, when pressed sets the current speed as the value to maintain, pressing the up and down arrows on the right side of the instrument changes the speed by 5 knots.
COL - avoids collision with land, when imminent collision is detected throttle and steering are used and take precedence over all other functions.
SAIL - sets the auto sail function for the sailboats, when enabled sails are adjusted to be optimally oriented to the appearent wind, also when enabled the boat will try to avoid sailing into the wind.