
When you press "Settings" the video dialog will appear, this screen has several tabs as well which select the settings you can adjust for the program, these include video, sound and joystick.
Press the "Video" tab to see the video settings, this will show the following screen:
In this screen you can select whether you want to use the program in full screen mode or window mode, and set the size and refresh rate of the full screen mode.
Using full screen modes allows the program to run faster when using lower resolutions as less computations for pixel shaders are performed.
The benefit of using a windowed mode is that it allows the program to be
minimized and run minimized, and also allows resizing of the program's window to
suit your needs.
The top of this dialog shows available screen modes, to select one of them,
you need to clear the option "Render inside window" and press
"Accept".
The "Use 24 bit depth buffer" allows you to render the view with less artifacts near the horizon, these artifacts are sometimes created when the distance of objects from camera is almost identical and the video card cannot tell which is closer, this results in flickering of some polygons near the horizon, this mode is also necessary for showing proper shadows in some cases.
The Graphic Quality settings allow you to adjust the general graphic quality
of the program before you open any situation, and also during an open situation.
If your computer exhibits low frame rates in situations close to the ground or
others, you may select "Best Speed" to test how frame rates can be
when all the high level features such as generated objects and vegetation are
turned off.
If your computer does not meet the minimal specifications or you are experiencing low frame rates open this dialog and select "Best Speed".
Press the "Sound" tab to see the sound settings, this will show the following screen:
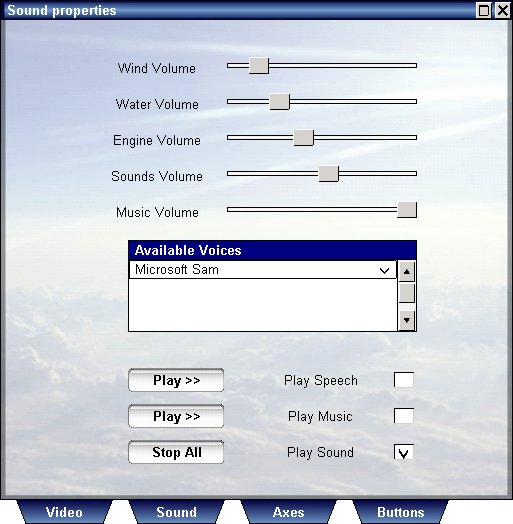
This screen allows you to set the volume for the wind, waves, engine and
other sounds, to enable music and speech, and select the voice of the
speaker to use.
The program uses the built in Microsoft text to speech engine, you can customize
speakers by downloading additional speaker voices from the internet.
To play speech inside the program, select "Play speech when
required" and select the voice of the speaker you wish to set from the list
of speakers above.
To play music inside the program enable the "Play music when
required", this will play an opening music on the main screen of the
program and also play music on situation start.
You can customize the music you hear during the game, look inside the music directory to add or remove mp3 files.
Press the "Joystick" tab to see the joystick settings, this will show the following screen:
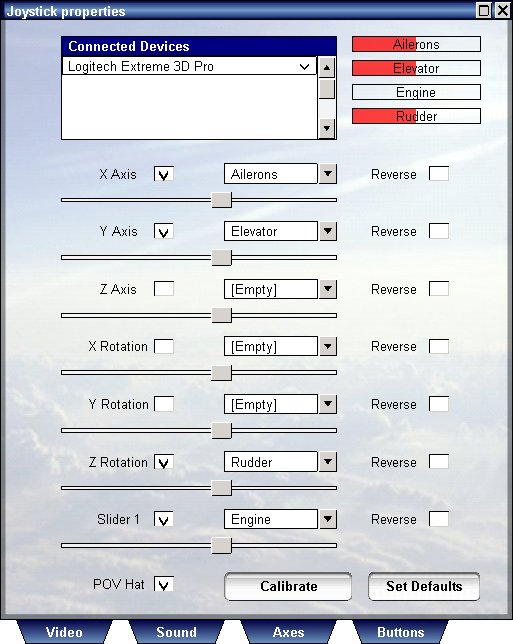
This screen allows you to select axes and sensitivities of joysticks you have attached and assign their inputs for the program.
Vehicle Simulator allows up to 6 joysticks connected simultaneously, for each joystick you see one line on the list that appear on the upper part of the dialog.
To select which axes you want to assign for these
joysticks, select the joystick first from the list above, then assign the actions you wish to
set.
For each joystick the assigned actions are different, selecting
engine for example for joystick number 1 will unselect this option for the other
joysticks on the list.
Each axis you assign will be drawn on the upper right corner so that you can see its function.
When the program starts for the first time it will select the default axes of your joystick according to the settings it detects, to set default axis assignment press "Set Defaults".
Vehicle Simulator also supports POV hats, and also Track-IR with vector expansion, when Track-IR is detected you will see an option called "Track-IR appear near the POV hat option box.
For each axis you wish to assign enable the check box near it's name, then select the type of action you wish to assign to it, in addition, you can adjust its sensitivity or reverse it's action.
To assign buttons for each of these joysticks, press "Buttons", the following dialog will appear:
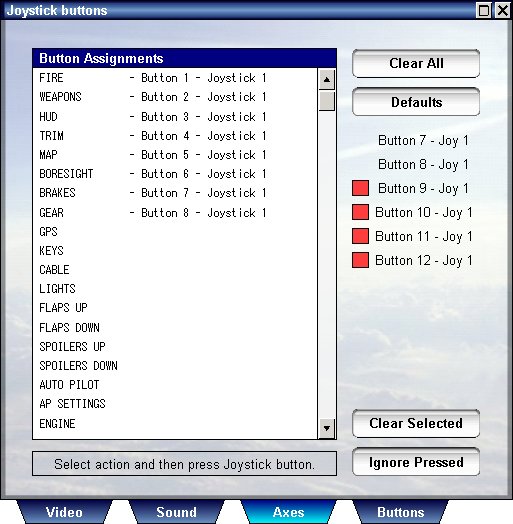
This dialog is much simpler, to assign an action for any button from any joystick you have connected, select the type of action from the list below, and press the button on the joystick, if the button is identified it will appear on the list beside the action you selected and the joystick from which it was read.
When the program starts for the first time it will select the default buttons of your joystick according to the setting it detects, if you wish to set this default selection again press "Defaults".
Some joysticks use buttons for mode selection, when this is the case some
buttons appear pressed without actually pressing them,
To ignore these buttons press "Ignore Selected" and then proceed to
assign buttons normally.
The ignored buttons appear on the right side of the dialog without a red rectangle, the other buttons you press appear with a red triangle.
To clear an assignment or to clear the ignore button list, press "Clear
Selected".
To clear all button assignments press "Clear", to return to the
axes assignment press "Axes".