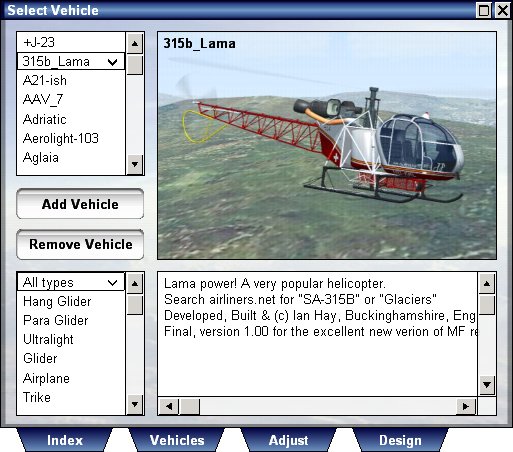
Press V to show the vehicle selection dialog, this dialog consists of three categories; index, vehicles and options.
This is the dialog which lets you select your own vehicle by its name and type.
When you select the type from the type box only vehicles of this type will appear on the upper list.
After selecting the vehicle from the list above, the properties of this vehicle will be shown below and its picture will appear above.
Press "Select Vehicle" to select this vehicle as your own vehicle, if you had another vehicle, this vehicle will be added and placed in the same position as the vehicle you had.
This is the dialog that lets you manage the vehicles in the scene, using it you can add vehicles, remove vehicles and adjust some settings for each vehicle.
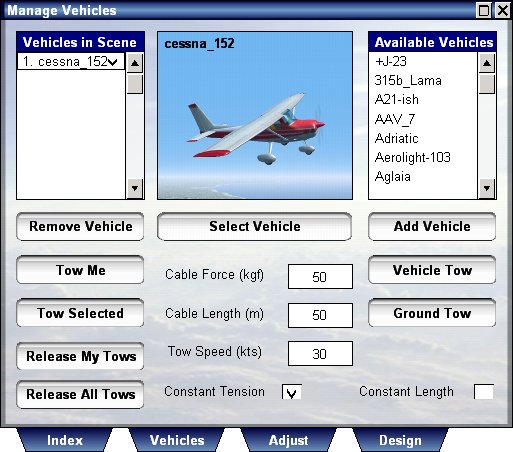
On the right side of this dialog you see the list of vehicles in scene, on the right side you see a list of available vehicles.
To add a vehicle to the ones in scene, select it from the right side list and press "Add Vehicle", after that you will see this vehicle appear on the left side list.
To remove a vehicle from scene, select it from the left side list and press "Remove Vehicle", it will be removed from the scene and left side list.
If you wish to replace your existing vehicle with one of the available vehicles, select it from the left side list, and press "Select vehicle".
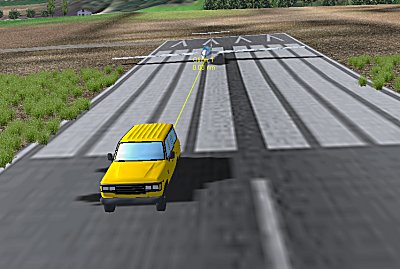
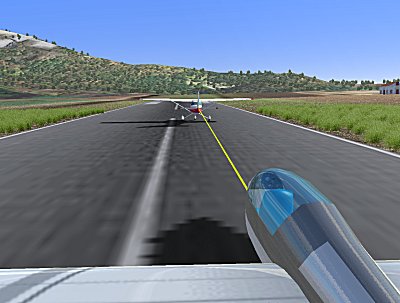
This dialog also lets you tow or be towed, vehicle tows can be ground tows, land tows, or aerial tows.
You can tow your vehicle by a ground vehicle, or by an another airplane, to select towing method, first be inside the vehicle you wish to tow, and then select towing method from the buttons below.
To have another vehicle tow you, you must be in control of one vehicle and then select the towing vehicle from the list on the left side, and press "Tow me", this option is suitable for case where you wish to have the vehicle in front of you tow you.
To have a ground vehicle added and tow your vehicle, you select the option "Ground tow" on the right side of the dialog, this will add a dummy vehicle which only functions as a ground towing point and disappears as soon as you release your tows.
To have a real vehicle be added in front of your vehicle, and tow your vehicle, select the option "Vehicle tow", this will actually add another vehicle at cable length in front of you and set its auto pilot to tow your vehicle.
For each of the three towing options, you have also some paramters you can adjust, these include:
You can select either a cable with fixed force and variable length, or a cable with a fixed length and variable force, the safest method to tow is the fixed force cable, this is the default method used.
To adjust the speed, force or length of cable enter the values you wish into the text boxes below, these values are set by the program according to the weight of the vehicle you select, but you can modify them as needed.
To select a ground tow press "Ground Tow".
To select an aerial tow, be inside the vehicle you tow, and select the towing plane for the right side list, then press "Vehicle Tow".
To release the vehicle you are towing or ones that are towing you, press "Release all tows".
Press the "Vehicle Adjust" button to show the vehicle settings, see details of this screen below.
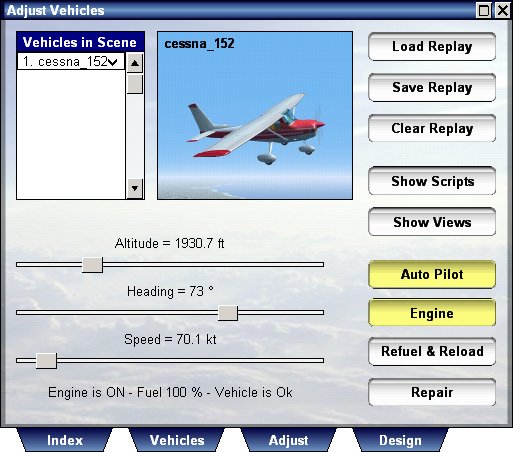
This screen allows you to adjust quickly some of the vehicle state, here you can enable the auto pilot, turn on the engine, refuel the vehicle, reload weapons and repair a broken or sunken vehicle.
You can also adjust the altitude, heading and speed of any selected vehicle.
Any vehicle can have a replay loaded and saved, replays are available immediately as you fly, or also after the flight is over, provided you have saved the replay for the vehicle you are interested in.
When you are loading a replay, the vehicle for this replay is also loaded, and the replay plays continuousely and functions as a traffic vehicle in the area in which it was recorded.
Press the "Replay" button to show the following screen, you can also press F8 to show this screen.
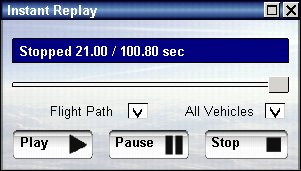
The replay mode, stores up to 5 minutes of vehicle replay, you can scroll through this replay, go back to a moment you wish, and then play it again.
You can also exit the replay at any moment and continue the flight from there, for example, when you practice a difficult maneuver, you can go over and over again to a point in time, and make the maneuver differently, the replay will record every attempt you made and will you them all if you choose.
Replays can also be saved and used as traffic in the same position they were recorded.
To save the replay of your current vehicle, press "Save My Replay".
When you load a replay it also loads the vehicle the replay was recorded on.
The replay dialog also shows the flight path, so you can see the replay path, you can also turn on this path by pressing Shift + P.
When loading a replay, the vehicle loaded will be in a looping replay mode, you can press "Clear My Replay" to turn off this mode.
Press the "Show Views" button to show the following screen, you can also press Shift + V to show this screen.
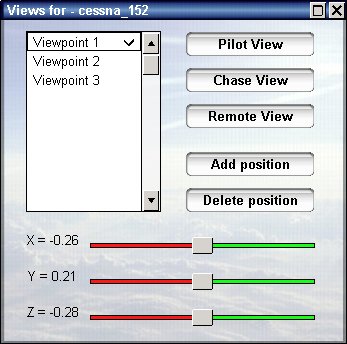
This dialog becomes active once you have a vehicle, then you have the following view options:
Pilot View - sets you at the cockpit, with default point of view for this vehicle.
Chase View - sets the camera in chase view around the vehicle, you can move the camera with the mouse.
Remote View - sets the camera in a stationary position outside the vehicle, you can move the camera with the mouse.
Leave vehicle - releases control of the vehicle and moves the camera outside, you can undo this by pressing Pilot View.
The list on the left side shows you views you have defined and saved, you can select any of them from the list to go quickly to this point, when you are in pilot view you see through this point, when you are in chase view you see around this point.
You can move your point of view with the three sliders, you can move the X, Y, Z coordinates of the view relative to the vehicle's body, you can also move your point of view using the mouse and keyboard.
Once you wish to save your position as a new view press "Add Position", when you wish to delete the last position press "Delete Position", all of these positions are saved in a file called views.cfg inside the vehicle directory.
There is a great similarity between the file views.cfg, lights.cfg and smokes.cfg, all of these files are in the same format and are all relative to the vehicle's body, you can easily measure positions on the vehicle and add views, thus creating a file you can use for other purposes as well.
Press the "Show Scripts" button to show the following screen, you can also press Shift + F8 to show this screen.

In this screen you see for each vehicle in the scene, if a script is loaded and the state of its execution.
A script is a set of commands which operate on a higher level that the vehicle auto pilot, and control the behavior of the vehicle for a specific task and time, for example "takeoff" or "land" are high level script commands that make the vehicle perform a series of operations untill a certain situation is reached.
If your vehicle shows very abrupt response to auto pilot commands, you can adjust the auto pilot gain, using vehicle design mode, a safe value can be 0.5, then save the properties for this vehicle.
For detailed explanation of the script language used see the Script Readme.
The script dialog, can be used to load a script of your choice from the scripts directory of the program, to clear an assigned script and to set the point of execution inside a script.
When you save a situation, the script or replay loaded for each vehicle are saved as well, and function as soon as this situation is reloaded.